Sunday 30 November 2014

24-28th November 2014: R-3.9 (Messing with Method)


Monday: Mixed Day. Some silly mistakes (failing to SAR and taking a doji trigger) and a few nice trades off a well behaved EJ chart.

Tuesday: Lots of Issues. Poor Prep (EU+EJ), Discretionary Exit (EU), Overtrading (EU).

Wednesday: No Trades, Too slow. Too great a work load updating S&R levels and highs on lows on 3 pairs.

Thursday: The Template For all Future Sessions. Simple PBs and RLs to 20EMA(and S/R) and SAR's when failed (EU)

Friday: OFF

Summary: Teething problems (messing with method!) at start of week, settled down on Thursday; Took John's comment on board dropping my work load. waited till actually wanted to trade (US session). Used 20EMA as barometer plus S&R to take trades (meant more of a waiting than "working" game), preprogrammed orders for all trades, walked away for a good deal of the time (updated stop levels occasionally), felt good.

Goal For next Week: Really very simple.... Same as Thursday's Summary...Took John's comment on board dropping my work load. waited till actually wanted to trade (US session). Used 20EMA as barometer plus S&R to take trades (meant more of a waiting than "working" game), preprogrammed orders for all trades, walked away for a good deal of the time (updated stop levels occasionally), felt good.

Friday 28 November 2014

Online Trading Academy Seminar

Okay, first let me say that I f**king hate seminars.  The only reason I went to this one is that John put me on to Sam Seiden (the head training officer at Trading Academy) and I really like his stuff. I had a few queries and thought I might get them answered. I've been to one other 4 years ago and that was enough to make me not want to go to another until today. This was not nearly as bad but still managed to take three and a quarter hours of my life and tell me nothing and will most certainly be my last.

When I asked questions they politely deflected them and when I mentioned that a small part of screen shot looked similar to a Nasdaq level II screen and whether that helped define supply and demand levels this got the "heavy" at the back to shoot up to the front and deflect the question for the speaker. I honestly wasn't being precocious, it just happened to be an unexplained part of the powerpoint slide.

Not that I was remotely entertaining it but the pricing was hysterical...  Started at £1000 for 3 day course, they then dropped that instantly to £200!,  then said if you place £2000 in an FXCM account you can attend for free! WTF?! Quite a few jumped at the chance but after the "heavy" stepping in at the mention of a possible order flow window and the speaker saying that you simply take trades from levels that Sam Seiden identifies and places on the website (a page which I've never seen on their website!). I can only imagine that much of their income must come from a subscription service, hence the massive subside. Or you're simply paying £200 to be told to subscribe to there service, God knows!

They happily showed trades that they took from supply and demand but would not go into how to they identified them (excluding the "Sam shows us" screen). However examining their charts rightly or wrongly this is what I gleaned...Supply/Demand areas to Buy/Sell from were....
  • often a series of small overlapping bars (2+ inside bars) almost like Al Brooks "barbwire".
  • Highs where price had dropped off a cliff and had still not returned to yet ("fresh" if you will). Implying that there are still lots of sell orders waiting at that level.
  • Lows that price had rocketed from and had still not returned to yet(again "fresh" if you will). Implying that there are still lots of buy orders waiting at that level.
  • A trader who was teaching the "£200 course" in the next room came in very briefly and said (and I paraphrase!) this "buy on return to demand, sell on return to supply"(duh!) AND "Big money can be seen, because they have too much of it. It is seen when price can not stay at a level. Meaning not all orders got filled so they have to wait for it to return to this level before recommencing" he also said something about how institutions wait for price 
  • ,  not chase price.  This I think ties in quite neatly with my observation of interest levels being where price either dropped off a cliff or rocketed to the moon. 
That's it. Nothing you couldn't get from reading Sam Seiden articles and examining his charts!

Thursday 27 November 2014

R-0.1: US Session, Simple PBs and RLs to 20EMA and SAR's when failed (EU)

Don't know what the fuck is going on with my platform but all my chart annotations have vanished after having shut it down my PC this PM vvv annoyed x-/! turns out I could pretty much remember everything...

Woke up 7am GMT, knackered.  Felt "body tired" that deep ache all over.  Got up did prep than watched the market put trades in front of me and didn't act, it was like watching someone else trade. Realized that this truly was just exhaustion, dimmed screen and had a relaxed morning.  Got back to chats around 2 pm GMT gagging to trade and did much better than rest of week.  Took John's comment on board dropping my work load. Used 20EMA as barometer plus S&R to take trades, preprogrammed orders for all trades, walked away for a good deal of the time (updated stop levels occasionally),  felt good.

EU Trades: Playing around with platform and accidentally closed "1" early. Mini flood in apartment meant missed "B",  "2" should have avoided as hammer trigger O/C was outside of prior bar's range!. "3" was a good SAR , worth knowing you can avoid a LSH/HSL and trade its SAR!. "3&4" exit little screwed as placed PT but didn't trigger.

Wednesday 26 November 2014

R-0: Way too Slow to Act, Missed an S Level (EU)

UPDATE: Sitting here this afternoon I can't help thinking I just wasn't enjoying the process M-W, it was not fun in any way and when I have fun I'm relaxed and do better. Had a chat with Brian Holiman recently...
BH:"the word struggling....I think if we just stopped struggling....we'd be good......
GD" you're absolutely right. I think (unnecessarily)"struggling" with obeying my method pretty much sums up my year.".... I WANT/NEED to have FUN.

I hate to change the plan, but damn am I slow.  Updating S&R and highs and lows every 5 mins in real-time on 3 pairs is a job and I missed a lot. Wondering if I can take classic PA reversals off major M30+M5 S&R at the top/bottom of a move on a candle reversal (a la Seiden). Then use moving averages (20ema + 240ema),  00s and .50s as a sort of prefilter for with trend PB/RL trades, matched with a bit of S/R respectively to ease up the work load, will try tomorrow.

EU Obs: Got caught up IDing M30 levels, instead of just looking left and labelling the obvious M5 ones

EJ Obs: Sam Seiden(ish) trades

Tuesday 25 November 2014

R-0.7: Doji trigger (EU) Good Trades (EJ) Failed to SAR (UJ)

MONDAY!

EU trade: started the day with this stinker (doji trigger).

EJ trades:  Liked and both these trades and still do.

UJ trade:  like this trade just should have SAR'd

R-3.3: Poor Prep (EU+EJ), Discretionary Exit (EU), Overtrading (EU).

Despite being deep in the red, I think my reads were quite good. The poor result is really more to do with my lack of  real time experience; being overwhelmed by the speed of the market and it's impact on my prep and decision making. But I don't believe these are things that can't be fixed simply with more real time practice! This is a demo account, it doesn't matter if I blow it up improving my reaction times.

Things learnt
  • Avoid doji triggers (did)
  • Colour M30 S&R blue
  • Colour M5 S&R dark blue
  • Let trades hit their ISL (tipping point) before taking a new position be they LSH/HSL or SARs


EU Trades:  Poor prep meant missed trade,  then "discretionary" exit caused over-trading.

EJ Obs: Missed a good trade because I hadn't clearly marked M30 S/R = colour code M30 and M5 S/R

UJ Obs: correctly avoided a doji trigger, but missed a PB

Friday 21 November 2014

17th-21st November 2014 : R-1.1 (Not Following the Plan Or Gaining Experience)


Monday: Off

Tuesday: R+0.7: Long on a PB and Short a M Top (EU) Just trading the plan. But still missed some trades on UJ

Wednesday:R-0.0: Lots of Trades But Quit Early As Not Obeying Plan.  Problem was I was keeping up with the highs and lows (that dictate my trades) but I wanted to trade against what they recommended so I quit early as I recognized this and I only create a huge hole when I do this.  This actually felt like progress to me... I guess real progress would be telling my brain to shut up and to trade plan, but as any reader of this blog knows I seem to prefer take a million tiny steps instead on one big one...

Thursday:R-1.8: Poor (Doji) Trigger (EJ), Failure to SAR (UJ).  Good day despite loss as I finally clarified in my mind what a good and bad doji is but again failed to follow plan (missed trades). 

Friday: Off

Summary: The fact is I have been avoiding loads of trades and I need to trade more, to enable me to learn and earn more. Recently I read this email from Paul Wallace
"Whether you’re a Greed Based Trader (GBT) or a Fear Based trader (FBT) you need your discipline to consistently follow either your Risk Management principles (in the case of a GBT) or the discipline to consistently follow your trading plan (in the case of an FBT).... unless someone manages risk or follows their plan with discipline and consistency they're wasting their time."
In all the trading books on psychology I have (Mark Douglas, Ari Kiev etc) I don't believe any have put it as clearly and succinctly, if at all. To be honest I couldn't always understand why I was struggling to move forward. I sorted my risk management out from the start but because I'm risk averse/ FBT, risk management was never really going to be a problem. This email laid it out for me, that my issues are going to be around NOT getting enough exposure to the market... I am a fear based trader and if I am failing to follow my plan (to take the trades it tells me), I am planning to fail! This was a major turning point for me.
Personally I believe my issues derive from what I call the 3P's (psychology, physiology, plan). This weekend I want to address... 1. Psychology: this weekend I want to spend sometime focusing on the positives of taking risks as I obviously gravitate towards the negatives!. 2. Plan: Not changing it but just getting it all down so there's no excuse for not following! (and adding not to trade indecision doji).

Goal For next Week: Really very simple....
Follow the plan for the entirety of my session Monday to Thursday (don't trade Friday's as work late Thursday night). Take every trade it indicates. Never argue with what the High's and Low's say, If I do, don't enter (you will be fighting the market)! Better still fight the urge and do the opposite. Be Realistic with PTs. And keep updating charts in trade!

Thursday 20 November 2014

R-1.8: Poor (Doji) Trigger (EJ), Failure to SAR (UJ)

Wasn't going to trade today,  but received a comment yesterday that gave me a kick up the ass (thanks).

All in the title and charts. But to clarify IMHO...

  • Doji with O/C near top or bottom = okay to trade (practically hammers and shooting stars).
  • Doji with O/C in the middle of range =  bad to trade (complete indecision) 
EJ Trade:

UJ Trade:

Wednesday 19 November 2014

R-0.0: Lots of Trades But Quit Early As Not Obeying Plan

Wrote it up in my summary last week, need to update rules with this though.  
"Follow the plan. Never argue with what the High's and Low's say. If you do, don't enter (you will be fighting the market)!"  (GOOD)

I also wrote...
"Get convergence on entries S/R + (20ema / .00/.50/ YHI/ YLO) . (BAD)Which often makes doing the first statement impossible. As when you see a HL @ S in an uptrend you defy the first statement if it hasn't got another bit of S. So you end up fighting /defying the series of HHs- HLs.  The truth as Al Brooks says is you've got to expect price to test the prior high in someway before it reverses. So even if price makes a HL / SL or LL if it's at S I should be trading back into R. So I double guessed the trend and setups so decided to stop in case I ballsed things up...

UJ Obs:

EU Obs

EJ Obs

Tuesday 18 November 2014

R+0.7: Long on a PB and Short a M Top (EU)

Missed a couple of trades on EJ and UJ... Sometimes the best PB trades look too deep.

EU Trades:

EJ Obs:


UJ Obs:

Friday 14 November 2014

10-14th November 2014: R-1.1 (Some Confusion, Some Anticipation and Trading Overtired)


Monday: Small drop in PL, confusion on SARing at a TSL, turns out I can. Would have been profitable had I.

Tuesday: First upturn in PL, simply followed the plan and shorted a LH at R + 20EMA

Wednesday: Failed to take any trades. Anticipation was caused by passing on a rarely traded CT Short. Retuned how I thought about taking CT trades (It's good to take them because the more experience I build with them the more a part of my arsenal they'll become). Would have been V profitable had I just traded the plan.

Thursday: Second upturn in PL, again simply followed the plan buying a HL at S+.00. Highlighted the importance of getting convergence on my trades.

Friday: Big drop in PL, as failed to follow the plan due to being over-tired and emotions took over rationale. Would have been profitable if I'd just traded the plan!

Summary: The Plan is profitable, I just failed to follow it! I've got to stop trading Friday morning's as I am over tired and struggle to follow the plan. Maybe when I am successfully following the plan for the entire week I can work it back in. Getting an extra reason to get long or short helps trade IE Support/Resistance + (20ema / .00 / .50 / Y Hi / Y Lo)

Goal for next week: Focus solely on what you need to do to make each session successful....
Follow the plan. Never argue with what the High's and Low's say. If you do, don't enter (you will be fighting the market)! Get convergence on entries S/R + (20ema / .00/.50/ YHI/ YLO) . Be Realistic with PTs. Keep updating charts in trade! Be aware that after a new level prints (high/low) its opposite can from very quickly after (low/high). Continue to trade should I go in the red, SAR's may not get me completely back in the black but they sure get me near. Let my trade plan and orders play out or I risk the very real chance of over-trading.

R-2.2: Simply Failed To Trade What The Plan Told Me To (UJ)

In Short: Saw a LL-LH this is my dictionary definition to short (no arguments), didn't like the "look" of it so went long instead (tw*t).

In Long: Thursday night / Friday AM I always question whether I should trade Friday's LON session.  This is because I work relatively late on Thursday nights. Sensible me says "don't trade you're tired".  Tough me says "so what if you're tired? everyone has to go to work tired sometimes, grow a pair".  I neglect that when tired I don't (or struggle) to do what needs to be done: follow the plan. And also unlike most jobs, when I make a mistake I lose money. When bars are being formed it's very easy to doubt them, this is what happened today. All those niggling doubts were no longer whispers but bullying shouts that ended up controlling me. Out of interested I'm going to go back and see how many Fridays I have actually recorded a positive PL... None! = Stop trading Fridays!

UJ Trades: failed to trade plan

EJ Trade: poor example of setup (could update plan to help)

EU Obs:

Thursday 13 November 2014

R+1.0: Simple PB Trade At Lots of S (EU)

Session highlighted the importance of getting a convergence S for longs or R for shorts.

EU Trade:

EJ Obs:

Wednesday 12 November 2014

R-0: Failed To Take CT Trade Then Market Ran Away (EU)

Simply failed to follow my plan. Need to check the 3P's (issue resides in fear =  need to do some retuning on CT trades... and in plan. Although the plan is clear this post in itself highlights both a good and bad CT trade which is a useful reference)

EU Ob's: Although failed to take a CT trade this chart does offer a good and bad example of it for future reference.

UJ Obs:

Monday 10 November 2014

FPAS Tipping Point Notes

Do have the time but not the inclination to write up all my notes from this book. I really enjoyed it,  it was like Al Brooks only simpler. Things that most stood out to me were his random "Notes" at the explanations of charts. Found these seriously interesting and informative and was a place where you got a feel for Volman's thought process, I might write some of these up in the future.  However the chapter "Tipping Point Technique" was the highlight of the book for me and this is what I will be writing up.

"naturally the decision to hold or exit should not be based on greed, fear,  gut feel,  or whatever false perceptions are known to warp a traders mind. at all times, it is a technical price level in the chart that determines what we can refer to as the tipping point of validity.

the ultimate tipping point -usually lies a pip above or below a signal bar or at a level above or below a top or bottom in a particular pattern.... it is worth checking nearby highs and lows particularly on polarity change levels as a couple of extra pips to the next level may be enough to keep you in a successful trade. The same applies when trailing your stop, Volman suggests not tracking miniscule PBs/RLs.

NB: for me as i use a signal bar at a prior hi or lo this should probably read... the ultimate tipping point -lies a pip above or below the signal bar at a top or bottom.

"the moment prices travel past the point of no return (Tipping Point), all bets are off and a trader has got to pull the plug.

"if prices go one way and then reverse, they will either leave a top or bottom in their wake. these tops and bottoms, the very footprint or supply and demand, will guide us into determining the current tipping points.

Psycho: "it is recommended to always expect prices, at some point, to travel against the open position.

bailing out of very healthy trades at the slightest sign of a pb, grabbing whatever tiny profit, is a sure fire way to remain stuck in the non profitable phase of trading.  a scalper, any trader, has to rise above his fears of losing and giving back profits, or else chances are slim that what is gathered in profit will sufficiently offset what will surely be gathered in loss.

Never forget the tighter ones stop, the smaller ones gains... It is not uncommon for a trade to come dangerously close to being stopped out, such is the nature of scalping and working with extremely tight stops. it cannot be stressed enough how important it is to not hit the exit button when confronted with these very typical counter attacks. when prices take their time , the power of demoralization can be excruciatingly strong. fight it. many times it is not the tipping point of trade validity that is surpassed, but merely the tipping point of what a trader can mentally bear.... do what needs to be done, even when it hurts...

true mastery is not so much defined by flawless understanding of PA principles but more by how much a trader is able to do what needs to be done. the true master will not be affected by whatever is happens on the chart.  He has no particular desire for consecutive winners, nor will he be effected by a string of losing trades.  The true master knows that every trade is just one out of many. he knows the odds favour his strategy, but he does not expect to win... if the market stops him out he will simply move on.

R-0.3: Failed to SAR (EJ)

Happy with today despite failing to SAR as I wasn't sure if I could do so on a TSL.

As I was TSLing each LH I guess this would have been a valid tipping point (place to SAR) especically as it coincided with a B&B Sweet Spot. Going go back over FPAS Tipping Point chapter today for some clarity.

UPDATE: I was tracking significant LHs so yeah this would have been a good place to SAR , load of cover orders were placed above it so a long here would have been good (B&B consensus/sweet spot). http://eurusdtradejournal.blogspot.co.uk/2014/11/fpas-tipping-point-notes.html

EJ Trade:

Friday 7 November 2014

3rd - 7th November 2014: R-3.9 (success went to head)


Monday: Failure to TSL meant late exit on a failed trend trade and so late entry on the SAR of it. So ended up buying where bulls were TPing.

Tuesday: Being unrealistic with PT.  Shorted but prior low only a few pips away, got hit, should have exited, didn't, it reversed and hit my ISL.

Wednesday: Again being unrealistic with PT, Got long into prior high, hit it,  held, PB and hit TSL. But focus on how to make session profitable was a better mind set.

Thursday: Not trading with trend and averaged down loss. Trying things out, not  too worried about this.

Friday: Know I'm off my game (+NFPs) so decided to end early and get summary done,

Summary: Basic, basic, basic, stuff lacking! Trend! TSL! Realistic PTs! Last week's success went to head, was focusing on LT goals in session rather than what needed to be done, as can be seen above (more here). Even the journal suffered ( was misidentifying faults). May sound down on myself  but I'm not, I just really needed to hammer home to myself here that I can't let the in session focus slip even for a minute... Not going to dwell but will remind myself occasionally this WE of what needs to be done then focus on relaxing and being fresh for Monday.

Goal for next week: Focus solely on what you need to do to make each session successful. Take each and every setup with the exclusion of  HM,SS, triggers that are not on S/R/small/ body's aren't contained by prior bar's range. Be Realistic with PTs. Keep updating charts in trade! And continue to trade should I go in the red, SAR's may not get me completely back in the black but they sure get me near. Let my trade plan and orders play out or I risk the very real chance of over-trading. Be aware that after a new level prints (high/low) its opposite can from very quickly after (low/high).

Thursday 6 November 2014

R-2.2: Not Trading With Trend = Fought The Market And It Won (UJ)

All in the chart but quickly...

1. Wanted to try trading levels with disregard of the trend. (won't be doing again!)
2. Trading before Data, despite low vol would have worked had I been with trend.
3. Averaging down on a trade, just felt like having a go (doubled the loss, ha!)

Tomorrow will get back to trend trading off levels and taking reversals (from a level) when trend fails. 

PM UPDATE: read this in Naked Forex: "Profits do not come from the trading system.  Profits come from traders. Traders find profits in the markets, and the tool (trading system) used to extract these profits is not as essential as the trader's execution.  The fatal mistake that most traders make is to assume that trading systems are responsible for profits"
I couldn't agree more with these words. I don't believe a candle setup has anything to do with profitability (buying a hammer at R?!). IMO all that matters is the accuracy of ones read. Today mine was awful and their was someone on the other side of everything I was doing. I don't feel any need to commend their trades but I certainly commend the effort they put into figuring the direction.

UJ Trades:

Wednesday 5 November 2014

R+0.2: Simple PB Trend, Unrealistic PT (UJ) Focus Only On How To Be Profitable

At one point up over R+1.0, was trying to hold to next level and let PA take me out rather than getting twitchy (which I achieved). The rest is in the charts...

UJ Trade:

EJ Obs:

Tuesday 4 November 2014

R-0.9: Shorting V Near To Where Bears Were Covering, Too Greedy On PT! (EU)

Of course then spotted good trades after this because re-focused on getting long where bears would be covering and short where bulls would be taking profit, but didn't take any... C'est la vie. Good real-time practice  though and "reprogram" of head ;-)

 EU Trade:

EJ Obs:

UJ Obs:

Monday 3 November 2014

Getting Back To Trend Trades

Last week and leading into today (Monday) I have been struggling to get in with the trend due to apprehension regarding HMs and SSs whipsawing me in the past. This fear has since flowed into bars resembling HMs and SSs.. So Hi Waves, Doji, and NRBs (so basically everything) castrating my ability to trade candle setups. Last week I was trading purely Ws and Ms reversals but in order for these to trigger a trend trade has to test the prior high/low (my PT) then fail. What I'm trying to say is that there's at least one trend trade before a reversal and strictly speaking a reversal is simply a failed trend trade. So trying avoiding trend trades is just avoiding profit.

The fact is I now know how to trade HMs and SSs in a trend now thank to reading "naked forex" last week...http://eurusdtradejournal.blogspot.co.uk/2014/11/naked-forex-notes.html

Also from reading a couple of things by Keith harrington II and Sam Seiden I realize I have not been focus on one of my favourite components the Bull and Bear Sweet Spot... http://eurusdtradejournal.blogspot.co.uk/2014/11/keith-harrington-iis-and-sam-seiden-we.html

Basically I want to trade every Bull and Bear Sweet Spot be it Counter trend or a with trend PB/RL with the exception of those with trend setups whose triggers are HMs and SSs that ...
  • print after a large correction 
  • Don't stick out of consolidation (HM lower/SS higher)
  • Don't occur on S/R level major or minor
AND SAR any with trend trades that fail.

In the last 2 weeks of the 22 with trend setups only 4 failed to reach the next level of S/R! An 80% success rate.

Keith Harrington II and Sam Seiden Confirm Importance of Bull and Bear Sweet Spots

For me the following posts highlight the importance of being aware of Bull and Bear ConsensusAt true reversal points there will be little fight as the balance of S+D are so out of whack that you basically get a consensus between the bulls and bears This is what I call on my blog a "bull and bear sweet spot". Bulls taking profit where bears are shorting and Bears covering where bulls are buying. It could be said that...
  • Little trading activity  = Consensus/Bull and Bear Sweet Spot... Therefore a reversal is very likely.
  • Heavy trading activity = complete indecision so therefore when past areas of it are approached by a trend in the future... Price will likely fall through it as neither the Bulls or Bears have nor ever had conviction in that area in the past. 
_______________________________________________________________________________
1. Keith Harrington II's PDF's: the following are a few short notes for my records... You can download them off his wordpress blog thefxbrickroad.wordpress.com from this post. He can also be followed on twitter: @elgitano5720... To anyone getting into S&R trading with candles this is a great place to start as not only is it explained he has created Q's and lessons along the way.

His favourite candle patterns are...
  • Hammers
  • Shooting Stars
  • Bullish Engulfing Patterns
  • Bearish Engulfing Patterns
  • Haramis (three inside up/down)
Below is page 25 of his PDF... All rights: Keith Harrington

_______________________________________________________________________________
2. JMF3 put me onto Sam Seiden some time ago and I am on the mailing list of the Online Trading Academy  whom he contributes for. He puts out about one article a week but I don't always keep up with them. Anyway most of them I get however this one made me think a couple of times because it challenged my status quo. You can find it here in its entirety. Below are the bits that made me think...

"Most people suggest you should focus on price levels where there was a turn in the past and to watch for heavy volume, above average volume. This is where the focus gets off track in my opinion. Think about it, at price levels where supply and demand are most out of balance which creates the highest probability turn, is there going to be lots of trading activity or very little? Like anything in life, the more unbalanced an equation or two competing forces are, the quicker and more predictable the outcome is. In a market, the more out of balance supply and demand is at a price level, the less the trading activity will be (because there's less "fighting" over direction). What this picture will look like on a price chart is not heavy trading activity and above average volume like all the trading education promotes, it’s actually the opposite (again because there's less "fighting" over direction).

Now the next bit blew my little mind...

"Conventional Technical Analysis would suggest you should not sell short at “B” because there is so much trading activity below which will make a price decline challenging. Many traders would look at all that trading activity in the circled area and not sell short at “B” because they would not think price could fall through that area. Again, to me, the focus and understanding is way off. The fact that there was/is so much trading activity in that circled area/congestion areas tells me price is very likely to fall through that level and should do so with ease. (because supply and demand were at an equilibrium If supply and demand were really that much out of balance in that area, you would not have so much trading activity. Price proceeded to fall through that area after “B” which was expected if your focused on the right logic. In summary, the major price turns in a market don’t typically happen at price levels where there is lots of trading activity, it’s the opposite. When looking for this on a price chart, don’t focus on levels surrounded by lots of pretty candles. The focus should be on price action mainly surrounded by white space".

The bolded bit are the important bits for me, the bracketed bits are explanations I've added for myself because for some reason I was struggling with the definition a little.
_______________________________________________________________________________

"Naked Forex" Notes

The bits highlighted in green are the things that are either integral to these guys method or that I have found most useful...

_________________________________________________________________________________
PART 2: ENTRIES / SETUPS
The following setups all have three components
1.  Identify S&R
2. Wait for price to reach one of these S&R zones
3. take a trade once a catalyst prints on of these zones
4. Buy and Sell stops recommended for all entries

Chap 4 Identifying Support and Resistance ZONES
Price is king , price will tell you all you need to know
 8 points on Zones
1.  zones are an area not  price point
2.  they get better with age
3.  are spots where price reverses repeatedly
4. maybe extreme highs or lows on chart
5.  are where naked traders find setups
6. rarely need to be modified
7. line charts help identification
8. are often seen by many traders.

How to find zones
1. start with a higher timeframe ( move up one or two timeframes from the one you are trading)
2. use a line chart to help
3. ignore minor zones


  • all setups must be on zones but wait for confirmation until we enter
  • the closing prices are the most important prices
  • don't worry too much about minor zones
  • when trading the higher timeframe chart, the only important zone are those major S&R zones , the standard zones
  • remember that zones have some leeway, touches will not be perfect, if the market trades beyond the zone it does not mean it is broken

The key to successful trading is to wait for the very best trading opportunities. these opportunities occur when the market reaches a well defined zone and then prints a catalyst. These are golden opportunities.


TREND SETUPS

Chap 5 The Last Kiss (BOPB/BDRL)
  • Basically a BOPB / BDRL of Range
  • once the market returns to the S/R zone it must print a strong bar in direction of BO
Chap 6 The Big Shadow (Strong BEP@S/R) See notes in reversal setups below

Chap 10 Trendy Kanagroo (Trend HMs /SSs)
  • Using HMs and SSs for with trend entries in fast markets
  • trend def: "is the line going mostly up,  mostly down, or mostly up and down?)  
  • trendy Kangaroos are places on the chart where the market has paused to take a rest (3-10 bars in a small consolidation overlapping)
  • the HM/SS tail itself must stick out beyond where the market has paused (HM on the downside /SS to the upside)  the more it does so the better
  • it is impossible for the trendy kangaroo to have space to room to the left
  • The trendy Kangaroo does not have to be on on S/R although it is better if it is
  • Enter a tick above a HM / below SS... ISL below HM low / above SS high
  • Warning: The trendy kangaroo does not occur frequently because the market does not trend that frequently,  be careful , there are many trendy kangaroo looking setups that are not ideal
Best Setups Trendy Kangaroos (With Trend HM/SS)
  • print during consolidation pause NOT large correction 
  • stick out of consolidation
  • Occur on S/R level major or minor
  • O/C contained within prior bar's range
REVERSAL SETUPS

The more space to the left /"air" a possible counter trend reversal has the better as this means the market participants won't have exhausted themselves (ie a level Bulls and Bears have been rowing over very recently will have depleted their supplies and ammo). Generally you want to see 7 bars minimum of "air" before a retouch. Also the more extended the better as it will likely be hitting a long term zone of S/R you can not see on your chart!
(Exhaustion) Reversals p104
Price action at exhaustion reversals will usually be extending beyond where the market has been trading for some time.  These are places where the market has simply gone too far
2 types of reversals are...1.  "All time" highs: where the market trades at a very high price ,  before falling and not returning to that high (nb will have reached a S/R level off your screen).... 2. All time Lows: where the market trades at a very low price ,  before rising and not returning to that low (nb will have reached a S/R level off your screen)These are the areas that traders around the world stare at wishing they had a way of entering on them.What almost all these turning points have in common is "room to the left" , no  price action to the left (or "air" between highs/lows). The general rule is the more space to the left, the more likely this spot is a long-term high / low.

Setups with "room to the left" (7 + bars of air) between the last touch of the S/R zone are most reliable.

If you don't get a get a BEP, HM/SS or Harami at a S/R zone then wait for a W / M before counter trend trading. 

Chap 6 The Big Shadow (Strong BEP@S/R)
  • Strong BEP at top/bottom of a move that prints on an S/R level that has some air between the last touch of it (more the better)
  • Must print on a zones at extreme highs or lows of move.
  • Big range and Solid close near hi/lo of bar in direction of Rev.
  • weakness close nearer midpoint of bar
  • Best BEP reach an S/R  level that has not been touched for 20-30+ bars. This is "room to left"
  • draw a rectangle if needed to aid in identifying how many bars of (air) "room to the left" 
Best setups
print at extreme highs and lows
have large ranges than past 10 bars
closes near range extreme

Chap 7 Wammies and Moolahs (W bottom and M top)
  • W bottom at S, second bottom is 6+ bars from first low, a HL (market losing momentum) and where you buy on a bullish bar (closing price near high of session), ISL at First High. 
  • M top at R,  second high is 6+ bars from first high, a LH (market losing momentum) and where you sell on a bearish bar (closing price near low of session), ISL at first bottom.
  • weakness =  multiple touches on S/R
Best Setups
  • have many bars between touches
  • have catalysts / candle reversals on second touch
  • Have significantly lower LH, / Higher HL
  • Are on well defined S/R
  • Have very few other levels nearby
  • Have room to left
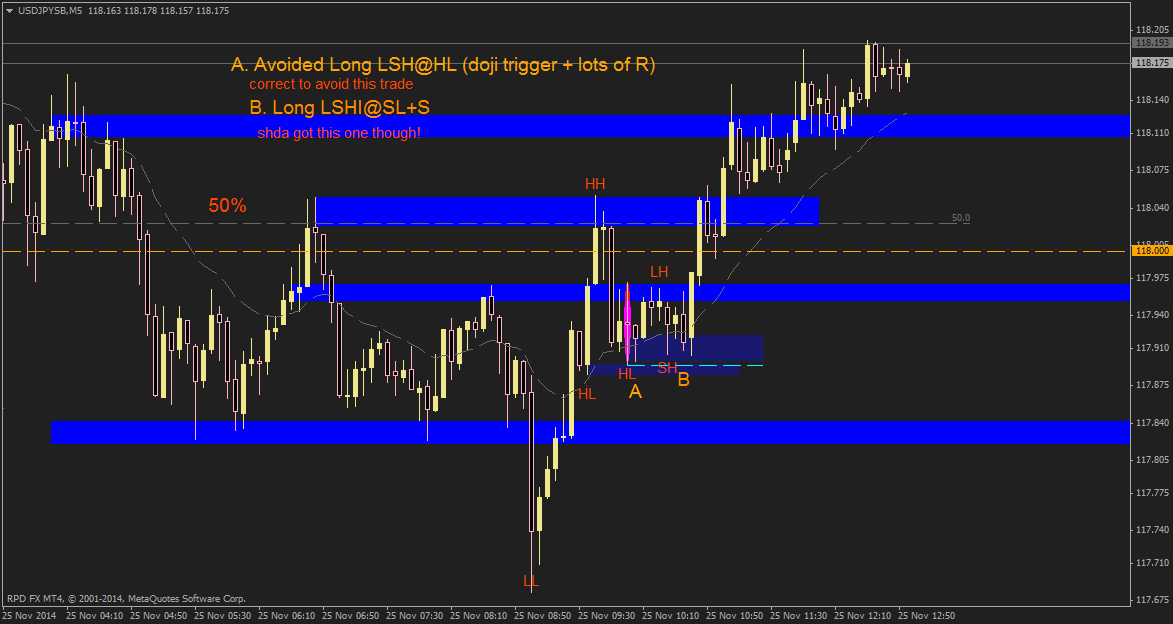
Chap 8 Kangaroo Tails
  • HM/SS Reversal at S/R or with lots of space to left
  • Should be larger than average bar
  • beware small tails
  • beware triggers that do not print on a zone
  • beware triggers whose O/C are not contained in the prior bar's range.
  • O/C near the extreme end of bar
  • small HMs and SSs are often simply weak pauses in the market so weak triggers
  • Beware giant candle sticks,  they make make HMs and SSs small and so weak
  • the best have a very large range , often greater than the candlestick prior to it
  • if in a drawdown of 75% of risk on a HM/SS trade close the position
Best Setups HM/SS Reversals
  • The best have very long tails  and very short bodies
  • print on an area that has not seen PA for a some time (not in a range)
  • HMs with close higher than open and SSs with C lower than O.
  • Larger (equal to) range than any of the past (5-)10 bars
  • O/C should be in prior bars range (HMs/SSs suggest runaway market)
  • Ideally at top/bottom of move with at least 7 bars between last touch of S/R
Chap 9 Big Belts: Can't be arsed writing this up as apparently best on D1 Monday charts. basically a dark cloud / Bullish piercing pattern.
_________________________________________________________________________________

PART 3: PSYCHOLOGY

Chap 11: EXITS
Going to include Exits in this section because the words on this really changed the way I thought about my trading. 

There are 6 parts to every trade... Exiting is often the hardest!
1. analysis: work out RRR
2. planning stage: create plan
3. entry: enter with odds in favour
4.  management: stay aware of what PA tells you
5.  exit: make money
6.  learning: improve by learning from the past 5 stages

Matching your exits with your psychology: When it comes to exits we all fall into 2 categories: 1.  Runners and 2.  Gunners. You can know who you are by answering this 
Q:  Is it more important for you to have a high win rate or to have huge winning trades?  
A: For me I certainly fall into the first category because I am a perfectionist....
If you would rather have a high win rate ( as I would), then you will probably have relatively small winners.  You may have a high win percentage of winners but the average winning trade will probably be relatively small =  Gunners  believe the chances of capturing a strong trend are quite minimal.  This is why gunners are fine with small consistent profits that they extract from the market (winning is everything to gunners so they struggle in losing streaks.
If you prefer to have huge winning trades this means that many of your trades may end up as losing trades,  or break even trades, but the few giant winning trade will make up for these losing  trades. = Runner /  Patience to wait for the rare but big moves ( Big Profits are everything to Runners. they are confident so confident it does not even diminish in a losing streak). It does not matter which is your style.  it is only important that you stick to your chosen style of trading, stick with what you believe.  You must trade in a manner that makes sense to you.

Gunner Exits:
Zone Exit:  exit at the next zone.
Split Exit:  1st zone then 2nd zone and move SL to BE when 1st PT achieved.

Runner Exits: BLAH not for me so not going to write out.

Chapter 12 The Forex Cycle

It is true that most traders do not consistently find profits,  the vast majority of FX traders lose money consistently.  Because of this,  many traders find it diffiuclt to stick with a trading system... the ironic thing is that the solution has nothing to do with the trading system....Profits do not come from trading systems.  Profits come from traders. Traders find profits in the markets, and the tool (trading system) used to extract these profits is not as essential as the trader's execution. The fatal mistake that most traders make is to assume that trading systems are responsible for profits. ( it is my read not the setup that makes me profitable)

Cycle of doom: 1 the search ( for a trading system you love). 2.  the action (of the system). 3.  the blame (of the system after a drawdown. To become successful you must break this cycle!

To break the cycle first accept that you are caught in this cycle,  accept that YOU are responsible for trading profits and losses and Backtest your system to create trust.

Chap 13 Creating your Trading System

once you learn to be an efficet trader,  your trading will become boring

Your beliefs wil drive your trading...

the rules:
the rules of your trading system will define how you interact with the amrket,  without rules you are simply gambling, your system rules also define what you should do in any situation. entrys exits management and risk. it may be tempting to create a system without precisely defined rules,  but know this: a well defined trading system is more likely to withstand your personal psychological attacks against your trading system. "Just this" trading leads to disaters,  so it is importnat to develop a system that is "just this" resistant. 

Trade specialist: only focuses on one setup ( most like me)

All trades have a beginning (filter for best trades) middle (in trade management from new market movement hi/lo) and end (exit)

TO DO "exit test" and "trading personality quiz" at fxjake.com/book


Patient traders will be able to endure the fluctuations in long term trades,  impatient traders will be find this difficult but make very good scalpers.

Dealing with drawn down
1.  go away 2.  back test.  3.  evaluate your trading statement. 4.  decide if system still works 5.  work on you (when confidence knocked the goal should just be to build it back up with a clear guide, by back testing and employing a positive mindset).

Plan for all things! if you decide on a plan of action before you are in the midst of a high pressure trading decision,  you and your trading account will be much better off.

If you exit prematurely , remember the rule is to trade just as if you were back testing it!...If you get very nervous watching your trades then it is probably best that you walk away. However if you can read PA well you may want to update SL during.

Decide if you're a trend or reversal trader

good habits: sleep ,  take care of body, limit time in front of screen,  some quite time alone can recharge the batteries... Make a game out of it, ie can only trade if you exericised or 7 hours+ of sleep . set goals to encourage good habits.

Do you decide to take only those trades that "look" right?  or do you take only those trades strictly defined by your trading system? As the pain of missing out is greater for me than the pain of losing  I should trade a system.

When you have a good run remember to celebrate your wins!

Key Points:

  • are you a market specialist or trade specialist?
  • how many hours of screen time do you allow yourself?
  • which trading session ?
  • which time frames?
  • which trading setups?
  • which exit strategy?
  • how much interpretation on entry?
  • how much interpretation on exit?
  • Max risk?
  • max weekly draw down?
  • max monthly draw down?
  • how to deal with draw downs?
  • how to regain confidence after a draw down?
  • how to keep healthy body?
  • How to keep healthy mind?
Chapter 14 Becoming an Expert

Some of the very best trades in the world share a simple secret:they use extremely simple and yet powerful trading systems

expert traders do more than simply follow strict risk management controls, they also concentrate on one market, ontrading system, one edge, and usse this edge in their trading repeatedly. Profitable traders are expert s, and these expert traders do one thing over and over again.

if you want to make money as a trader do what the experts do. become good at trading one system.  You simply put in practice and become an expert with a trading system that makes sense to you.  trade your system over and over again until trading becomes boring (and ver profitable).

the traders that struggle , the traders who have difficultly finding consistent profitsare the ones who repeatedly change their systems, reanalyzing and reorganizing thier trading rules (cycle of doom) ring a bel George?!

what is your expertise?  which trading system fits your beliefs? Once you align your beliefs with a trading system,  you simply need to gain experience and confidence in the trading system,  and you will never look back.

6 Steps to becoming an expert
1. become confident drawing zones on  your charts
2. Choose one trading cataylst (setup) that you want to build your expertise on
3. Back test risking 2% or less,  triple your acount.
4. Forward test risking 2% or less,  triple your acount.
5. Trade a small account risking 2% or less,  triple your acount.
6.  Trade a Live Account risking 2 % or less on each trade,  stick to your trading rules.  focus solely on following your system rules

If you find yourself bored with your trading , you are probably consistently profitable. this is when you'll think about changing your strategy. Learning another system isn't necessary but can help reduce risk

Trading should be fun , but if it is exciting, it is a sign the system is unproven or you are risking too much.

Chapter 15 Gaining Confidence

confidence is the most importnatn ingredient for trading success.  confidence will help you profit with an average trading system,  but without confidence you will be unable to find success, even with a brillinat system... a lack of confidence in the trading system or in yourself are the two confidence issues in trading....most of the time a losing streak is due to the wrong application of the trading system.  in other words, most losing streaks are due to misapplication of the system, caused by the trader and not the system itself.

Risk Problems
many prop traders are profitable becuase their is a built in discipline system at a bank... reatil traders do not have risk managers

Changing Systems
if you have a losing streak you may become too careful or too reckless with your trading system... it is imporntant to keep track of what you are doing with a journal

Missing Out
traders may end up with a losing streak simply because they miss out on some trades... the problem is that if winning trtades do not occur that often it is imperative that all trae are taken to make sure the winners are captured...technology may be your answer...the key is to be prepared... use alerts etc

Self COnfidence
confidence does ebb and flow.  there are 3 things you can do to combat it,
1.  consistently execute your trading system as it was outlined in your system rules. more importnatly you must know , without a doubt , the reason why you have chosen to execute your trading system. basically your beliefs must align with your trading goals/ system.
2. The trading system you employ depends on you. in order to execute it you must have an established routine.... Min rountine must include When will i look for trades? how will i calculate trade size? how often will I check my charts? How will I be alerted to trading opportunities? How will you be alerted when you need to manage trades?
3. the fastest way to regain confidence is to backtest. the simple act of taking 50 trades in Forex tester puts another 50 trades under your belt.

Reasons for losing...
poor execution
changing market
bad technology
dishonest broker
trading system not flexible enough
ARE EXCUSES

Losing trades are really due to one thing - bad luck. Luck will come and go , as you know, the drawn don your experiencing will be temporary and as long as you do not change your rules, you will get it back on track soon. But bad luck is the reason why a trade ends up a loser....Thinking about your next trades in terms of probabilities may  help you to refocus on what is important: following your trading system . worrying about any one trade or emphasizing reasons why you trade lost money is not important.  the big picture is important, the overall probability of a winning trade is important.  a specific trade is not that important..

if you concerned about a recent losing streak for you trading system, compare your historical win rate to the win rate of the last 50 trades. If the historical win rate differs greatly from the current win rate,  the trading system maybe losing its potency.

Chapter 16 Managing Risk

risk and trading psyhchologuy are two sides of the same coin

your risk profile:  you are the one who knows whether you will make money or not,  even though you may not have concious access to this information...your belifs drive your behaviours...if you believe you are worthy of of trading profits,  you will be able to make money.  if you do not believe your trading will lead to profits , you will not be able to consistently make money. it doesnt mater if youd ecide to work in business or in trading...  you win or lose because of your beliefs

attitude to money:  if you believe money is good and you are worthy of wealth, money is more likely tocome to you... if you think that rich people simply make loads of money because rich people are very motivated to make moeny.  you are much more likely to join the weathy crowd.
GD:  I need to start each morning thinking how can I make money!

inproper risk management leads to emotional trading problems

emotional issues are always related to your confidence in trading,  the current trade in play or your trading system... but emotional trading is not destructive,  the only destructive trading is trading that is not according to your rules....the antidote to overemtional traidng is to apply proper risk managment to your tradesuse a well rehearsed set of trading rules and apply these over and over again in your trading

worst case planning:  worst case planning means planning for the maximum loss on each trade.  this way , the max loss can;t hurt you. if you walk outside everyday when it's hot the asphalt slowly becomes bearable.

risky money traps:  the number one trading skill you need to succeed as a trader is the ability to protect your trading account,  to play defensive. Traders who are unable to protect thier money have difficulties with beliefs..

1.Its fine to dump a a trade because my belief seems to be incorrect (provided you're using PA not emotion as a barometer) this is fine
2. Walking away from the screen is fine too
3.  moving SL or PT is not okay this is adpating your plan.

listen to the market

remember to kepp your beliefs in perspective... thorw away your belifs whne you the market tells you they are incorrect.,  keep your money instead.

concentrate on yur trading, execute each trade as best you can.  the money will come if you concentrate on becoming a better trader

it is possible to do exceptionally well , even if you start off in a small account,  the focus should be on trading your system..  the fact that one person considers an account small while another thinks its huge,  is evidence that attitude has a far greater impact than size.

if you have problem with money and weathy people , you are sure to your performance suffer

Thinking that trading easy:  be careful of this overconfidence that often appears as the successful trding is easy idea.  trading can be successful and simple,  but that doesnot make it easy. success requires backtesting, developing a thorough trading plan. creating a method for overcoming the doldrums and drawdowns. planning is critical for you to succeed in the longterm but you will also need a healthy dose of determination!

you simply must have determination to succeed in trading  ( or any other endeavour) all successful people share determination!

R-0.8: Trend A Little Off, But Ultimately Slow To TSL = Late SAR (EU), Fearful of Trend (EJ)

Poor In-trade Management Resulted In Late Exit and Missed SAR (EU)
Also still fearing with trend trades (EJ)

EU Trade:

EJ Obs: